Setup
If you want to use Cloudflare as your primary DNS provider and manage your DNS records on Cloudflare, your domain should be using a full setup.
This means that you are using Cloudflare for your authoritative DNS nameservers.
Before you update your domain nameservers, make sure that you:
- Already own a domain name (such as
example.comorcloudflare.com).
- Have previously created a Cloudflare account.
- Disabled DNSSEC at your registrar (where you bought your domain name).
Provider-specific instructions
This is not an exhaustive list of how to update DS records in other providers, but the following links may be helpful:
In the Cloudflare dashboard, add your domain.
If Cloudflare is unable to identify your domain as a registered domain, make sure you are using an existing top-level domain ↗ (.com, .net, .biz, or others).
Cloudflare requires your apex domain to be one level below a valid TLD defined in the Public Suffix List (PSL) ↗. Enterprise customers can onboard lower-level subdomains using Subdomain setup.
When you start using Cloudflare's nameservers for authoritative DNS and your zone is in a full setup, Cloudflare will become your primary DNS provider. This means that your DNS records in Cloudflare need to be accurate for your domain to work properly.
When you add a new site to Cloudflare, Cloudflare automatically scans for common records and adds them to the DNS zone. The records show up under the respective zone DNS > Records page.
Since this scan is not guaranteed to find all existing DNS records, you need to review your records, paying special attention to the following record types:
- Zone apex records (
example.com) - Subdomain records (
www.example.comorblog.example.com) - Email records
Once you have added a domain (also known as a zone) to Cloudflare, that domain will receive two assigned authoritative nameservers.
-
Log in to the Cloudflare dashboard ↗ and select your account and domain.
-
On Overview, locate the nameserver names in 2. Replace with Cloudflare's nameservers.
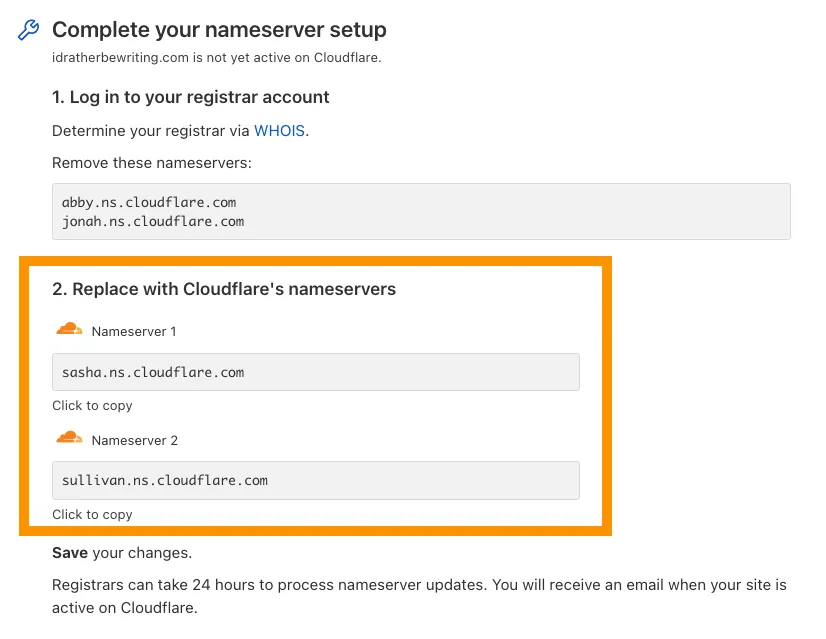
- Keep this window open while you perform the next step.
- Log in to the admin account for your domain registrar. If you do not know your provider, use ICANN Lookup ↗.
-
Remove your existing authoritative nameservers.
-
Add the nameservers provided by Cloudflare. If their names are not copied exactly, your DNS will not resolve correctly.
Provider-specific instructions
This is not an exhaustive list of provider-specific instructions, but the following links may be helpful:
- Ionos ↗
- 101Domain ↗
- Amazon ↗
- Blacknight ↗
- BlueHost ↗
- DirectNIC ↗
- DNSMadeEasy ↗
- Domain.com ↗
- Dotster ↗
- DreamHost ↗
- EasyDNS ↗
- Enom ↗
- Fast Domain ↗
- FlokiNET ↗
- Gandi ↗
- GoDaddy ↗
- HostGator ↗
- Hostico ↗
- HostMonster ↗
- Hover ↗
- Internetdbs ↗
- iPage ↗
- MelbourneIT ↗
- Moniker ↗
- Name.com ↗
- Namecheap ↗
- Network Solutions ↗
- OVH ↗
- Porkbun ↗
- Rackspace ↗
- Register ↗
- Squarespace ↗
- Site5 ↗
- Softlayer ↗
- Yola ↗
Wait up to 24 hours while your registrar updates your nameservers.
When your domain is Active:
- You will receive an email from Cloudflare.
- Your domain will have a status of Active on the Websites page of your account.
- Online tools such as https://www.whatsmydns.net/ ↗ will show your Cloudflare-assigned nameservers (most of these tools use cached query results, so it may take longer for them to show the updated nameservers).
- CLI commands will show your Cloudflare-assigned nameservers
*Linux/Unix*dig <DOMAIN_NAME> +trace @1.1.1.1dig <DOMAIN_NAME> +trace @8.8.8.8
*Windows*nslookup <DOMAIN_NAME> 1.1.1.1nslookup <DOMAIN_NAME> 8.8.8.8When you updated your nameservers, you should have also disabled DNSSEC at your registrar.
You should now enable DNSSEC to protect from domain spoofing.